Create or Edit a Customer
Use this form to add a new customer, look at a customer's details, or change them.
To open it:
- New customer: on the Customer List, click Create Customer.
- View a customer: click View on their row. All fields are read only. If your role can edit customers, an Edit button appears at the top.
- Edit a customer: click Edit on their row.
You can only view or edit customers you can see on the Customer List. For any other customer, you see You are not allowed to access this customer.
Permissions
Set in Role & Permission:
| Item | Permission |
|---|---|
| Create a customer | Customers > Create |
| View a customer | Customers > View |
| Edit a customer (Update) | Customers > Edit |
| Reassign Agent tab | Customers > Reassign agent, and Users > View to list the agents |
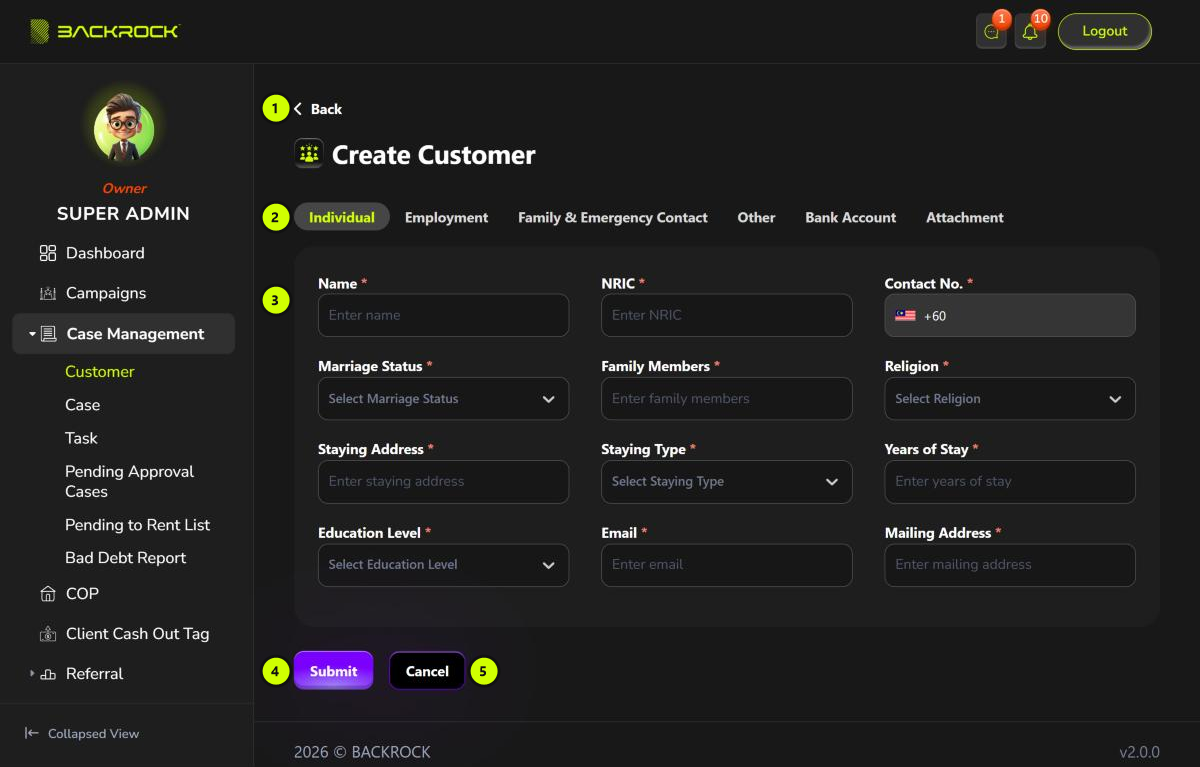
1. Back
Returns to the Customer List.
2. Tabs
The details are split into tabs. Click a tab to see its fields.
| Tab | What you fill in |
|---|---|
| Individual | Name, NRIC, contact number, marriage status, family members, religion, staying address and type, years of stay, education level, email and mailing address |
| Employment | Company name, nature of business, job position, years of service, date of join, basic salary, fixed allowance, office address and contact number, whether the customer is working now, permanent or contract staff, confirmed staff, EPF and income tax. Previous Company Details are optional |
| Family & Emergency Contact | The mother's details, the spouse's details (optional) and two emergency contacts |
| Other | The personal loan amount needed, professional certificate, tenancy agreement, and the customer's banks. If you answer Yes to a question about rejected or blacklisted banks, choose the banks in the list that appears. Click New Data to add another bank |
| Bank Account | Bank name, bank account number and bank account name |
| Attachment | A Dropbox link to the customer's documents (optional) |
| Reassign Agent | Only if your role can reassign customers. When viewing a customer it is read only; to change the agent, use Edit. See Reassign Agent below |
3. Fields
Fields marked with a red * are required.
- The contact number for a new customer always uses the Malaysia country code +60. Type the rest of the number.
- Each customer needs a different phone number. If the number is already used by another customer, you see Phone number already exists.
4. Submit / Update
- New customer: click Submit. You see Customer created successfully and return to the Customer List.
- Edit: click Update. You see Customer updated successfully and stay on the page.
If a required field is empty, it shows This field is required. The form opens the first tab with a missing field, and every tab with a missing field shows a warning icon.
If your role can reassign customers, the new customer belongs to the company. Otherwise, the new customer belongs to you.
The customer also gets an invitation code to register in the Member Portal. You can copy the link from the Customer List.
5. Cancel
Returns to the Customer List without saving.
Reassign Agent
Use this tab to move a customer to another agent.
- Open the customer with Edit and click the Reassign Agent tab.
- Current Agent shows the agent the customer belongs to now. It is empty if the customer belongs to the company.
- Choose the New Agent. You can type to search.
- Click Update, then Yes to confirm.
You see Customer agent reassigned successfully. The customer's open cases that the old agent was handling move to the new agent too. Cases that are completed, dropped or rejected stay with the old agent.