Payment
Use Payment to record money a customer has paid for a case. Each payment goes through an approval. Once it is fully approved, it counts towards the case's paid amount.
To open it: in the left menu, click Finance > Payment.
You can also open it from the Customer List: click Payment on a customer's row to see only that customer's payments. Click Clear filter to see all payments again.
Permissions
Set in Role & Permission:
| Item | Permission |
|---|---|
| Payment menu, list and View | Payments > View |
| Create Payment | Payments > Create |
| Delete | Payments > Delete |
| Approve or reject a payment | Set per layer for payment approvals. See the Approval page |
Payment List
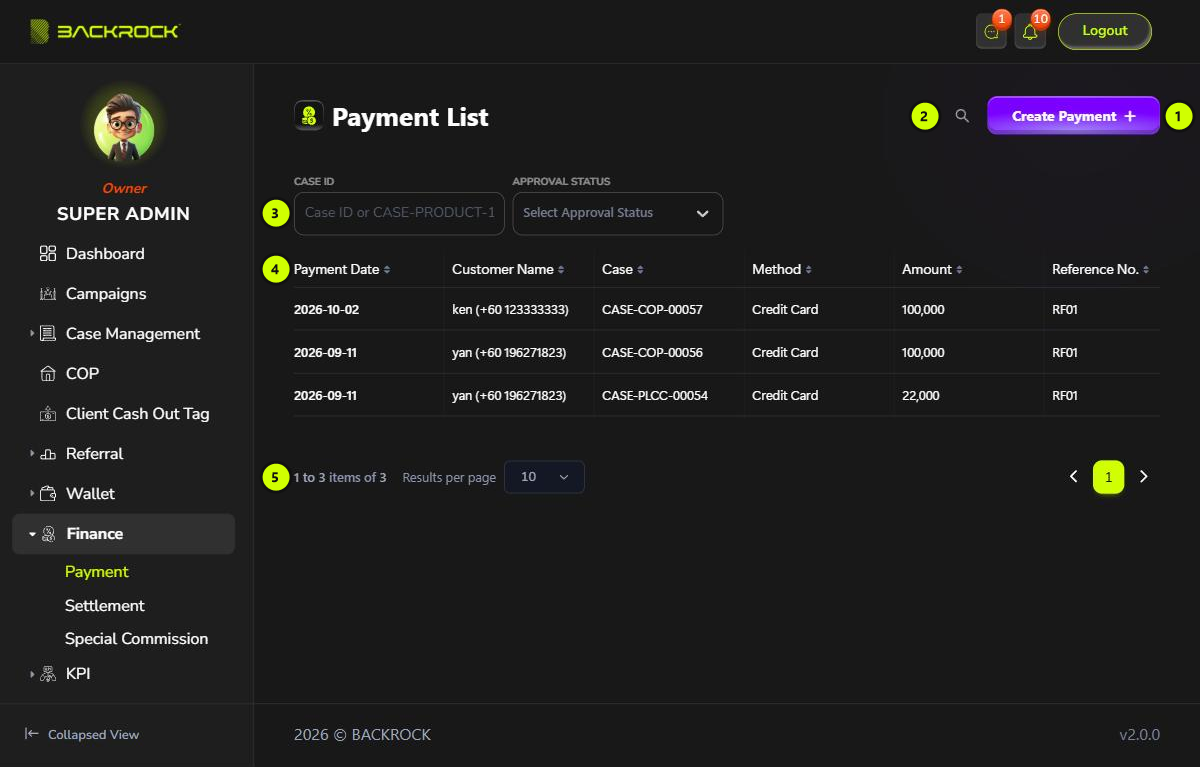
1. Create Payment
Opens the form to record a new payment. See Create a payment. You only see this button if your role can create payments.
2. Search
Click the search icon (🔍), then type a customer's name or phone number, a reference number or an amount. The list updates as you type.
3. Filters
| Filter | What it does |
|---|---|
| Case ID | Type a case number, for example CASE-COP-00057 or just 57. Click x to clear it |
| Approval Status | Shows only Pending, Approved or Rejected payments. Click x to clear it |
4. Payment table
The newest payments are shown first.
| Column | What it shows |
|---|---|
| Payment Date | The date the payment was made |
| Customer Name | The customer, with their phone number |
| Case | The case the payment is for |
| Method | Credit Card, Debit Card, Bank Transfer, Cash or Cheque |
| Amount | The amount received |
| Reference No. | The payment's reference number |
| Status | See Approval below |
5. Pages
Use Results per page and the page numbers to move between pages.
Approval and actions
The table is wider than the page. Scroll it to the right to see the approval columns and Action.
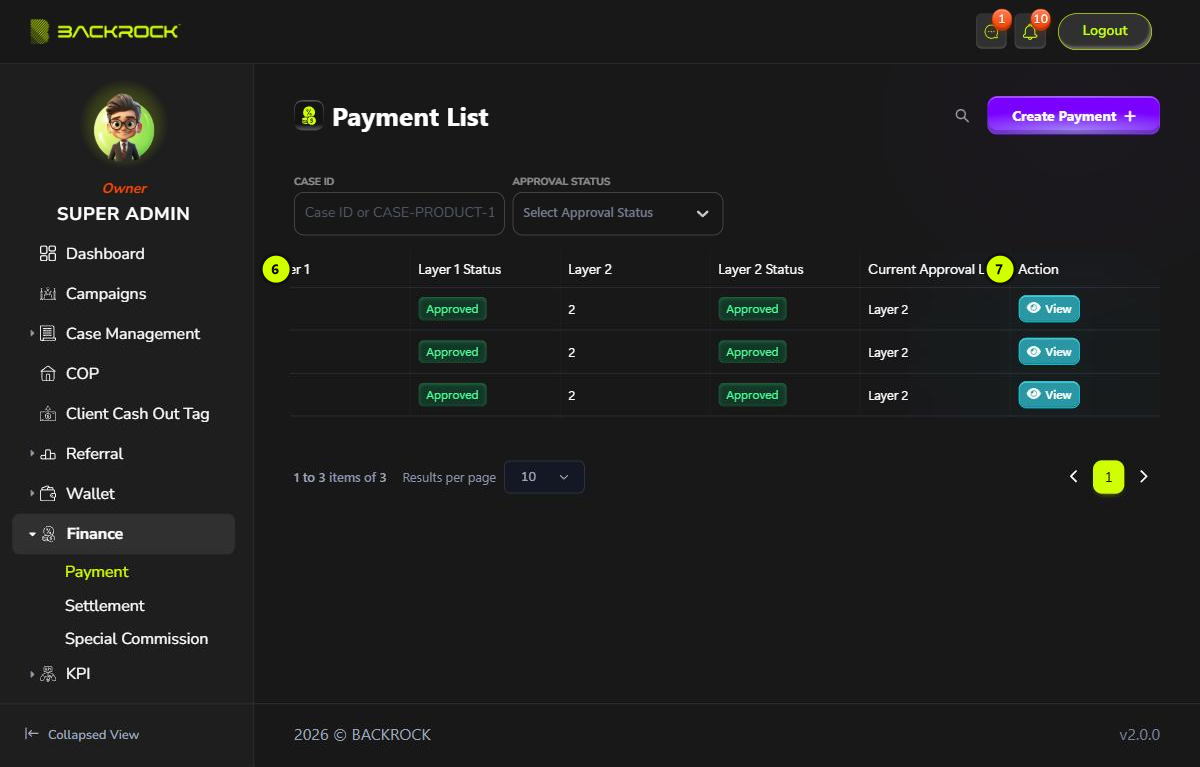
6. Approval columns
| Column | What it shows |
|---|---|
| Layer 1 | The name of the first approval, for example Admin Approval |
| Layer 1 Status | The result of the first approval |
| Layer 2 | The name of the second approval |
| Layer 2 Status | The result of the second approval |
| Current Approval Layer | The approval the payment is waiting for, for example Layer 2. — once the payment is approved or rejected |
7. Action
| Button | When you see it | What it does |
|---|---|---|
| View | Your role can view payments | Opens the payment details |
| Delete | The payment is still waiting for the first approval, and your role can delete payments | Deletes the payment. Click Delete to confirm. You see Payment deleted successfully, and the payment is removed from the list. Once the first approval is done, the payment can't be deleted |
Create a payment
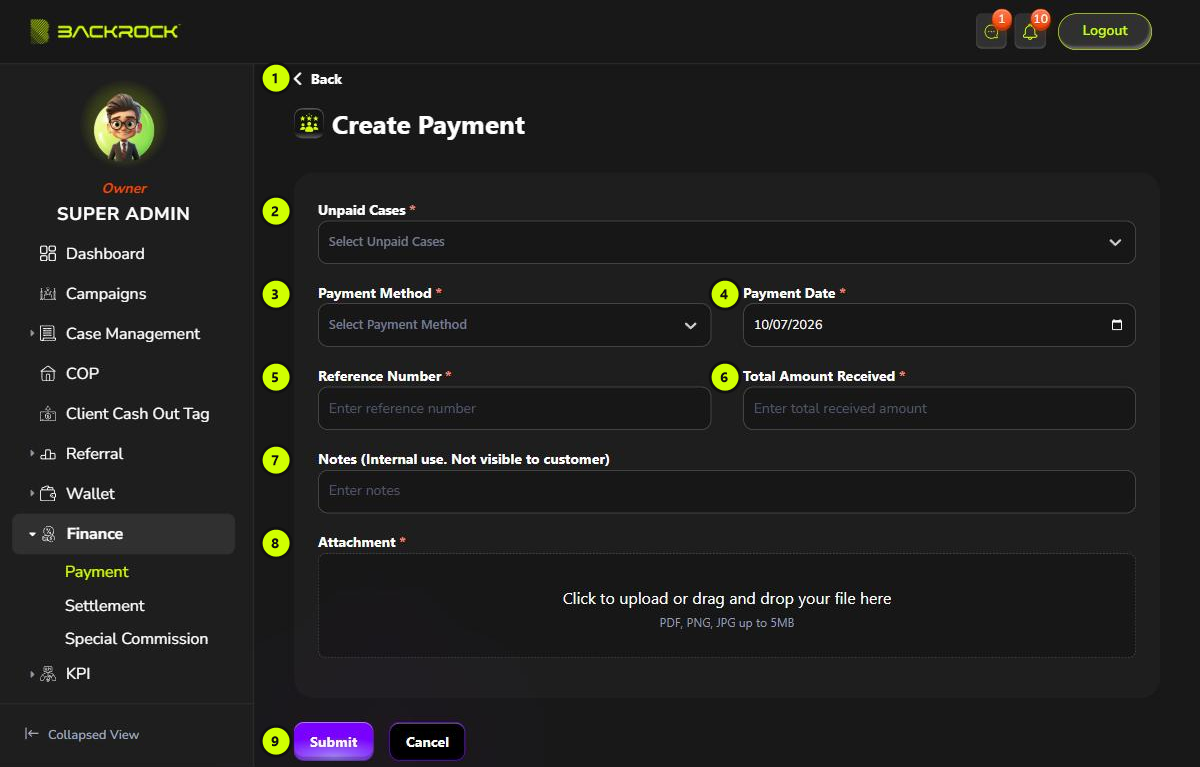
- Back: returns to the Payment List.
- Unpaid Cases (required): choose the case the payment is for. Only cases that are not fully paid yet are listed. After you choose a case, a panel shows the Customer, the Total Remaining Amount and the Total Pending Approve Payment Amount (payments already sent for this case that are still waiting for approval).
- Payment Method (required): Credit Card, Debit Card, Bank Transfer, Cash or Cheque.
- Payment Date (required): today's date is filled in. You can change it.
- Reference Number (required): the reference of the payment, for example the bank transaction number.
- Total Amount Received (required): the amount the customer paid. Below it, Maximum receivable amount shows the most you can enter: the remaining amount minus the payments waiting for approval.
- Notes (optional): for your team only. The customer can't see them.
- Attachment (required): click the upload area and choose the payment proof. You can add more than one PDF, PNG or JPG file. Click the bin icon to remove a file.
- Submit: click it, then Submit again to confirm. You see Payment created successfully and return to the Payment List. Click Cancel to leave without saving.
If a required field is empty, it shows This field is required. You also see:
- Total amount must be greater than 0 if the amount is 0.
- Total amount received cannot exceed the available remaining amount if the amount is more than the maximum.
Approval
A new payment starts as Pending and goes through two approvals, Layer 1 then Layer 2. The people who can approve each layer get a notification. They approve or reject the payment on the Approval page.
| Status | What it means |
|---|---|
| Pending | Waiting for approval |
| Approved | Both layers approved. The payment now counts towards the case |
| Rejected | Rejected at one of the layers. The payment does not count |
When a payment is fully approved, the case's paid and remaining amounts are updated. When the case becomes fully paid, the case moves on to its next status and the commissions for the case are worked out.
Payment details
Click View on a row to open Payment Details. Everything is read only.
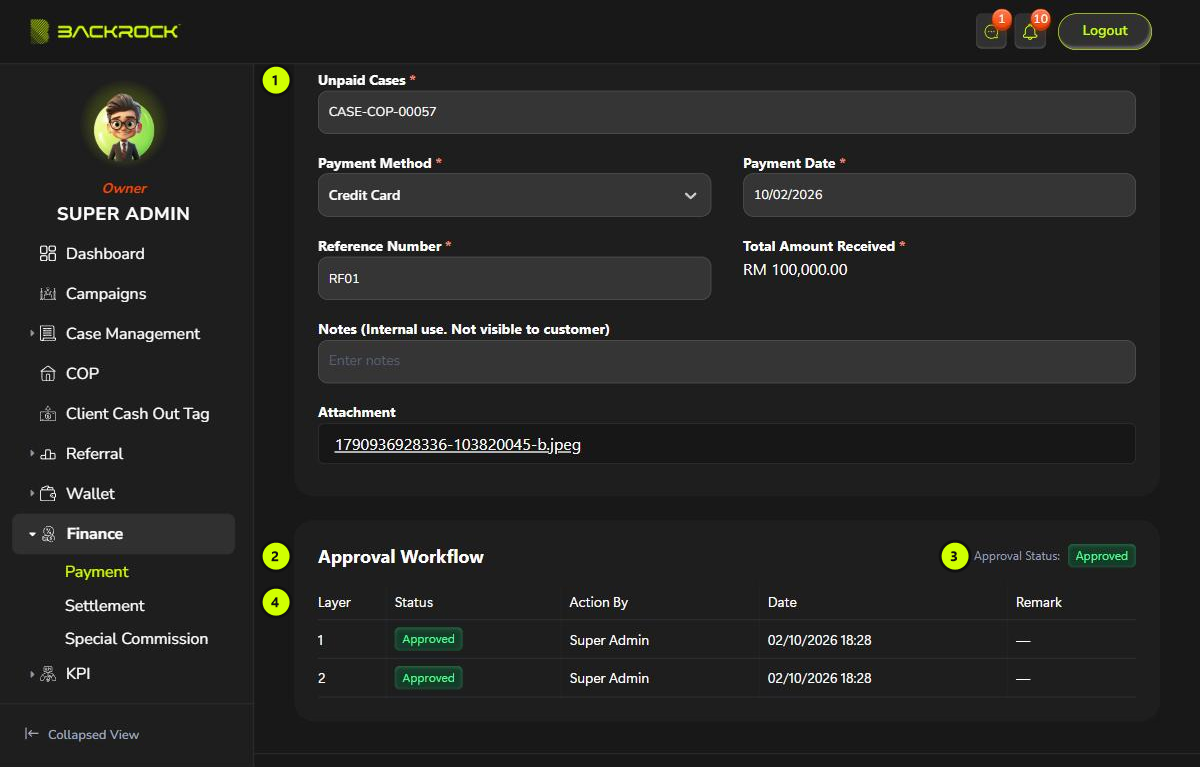
- Payment details: the case, method, date, reference number, amount, notes and attachments. Click an attachment to open it.
- Approval Workflow: the approval history of the payment.
- Approval Status: the overall status of the payment.
- Layer table: for each layer, its Status, who acted (Action By), the Date and the Remark.