Payroll
Use Payroll to prepare each employee's monthly payslip. A payslip adds up the basic salary, fees, allowance and the employee's commission, takes off the deductions, and shows the Net Pay. Each payslip goes through an approval.
The salary itself is paid outside the system. When a payslip is fully approved, the commission it includes is taken out of the employee's wallets, and you can keep the payment proof on the payslip.
To open it: in the left menu, click Payroll.
Permissions
Set in Role & Permission:
| Item | Permission |
|---|---|
| Payroll menu and your own payslips | Payrolls > View |
| Everyone's payslips | Payrolls > View all |
| Open anyone's payslip from the Approval page | Payroll Approvals > View |
| Create Payroll | Payrolls > Create and Payrolls > View all |
| Employee list in the form | Users > View (Users > View all to list employees of other departments) |
| Edit, Update Payment Proof | Payrolls > Edit |
| Delete | Payrolls > Delete |
| Approve or reject a payslip | Set per layer for payroll approvals. See the Approval page |
12-Month Payroll Overview
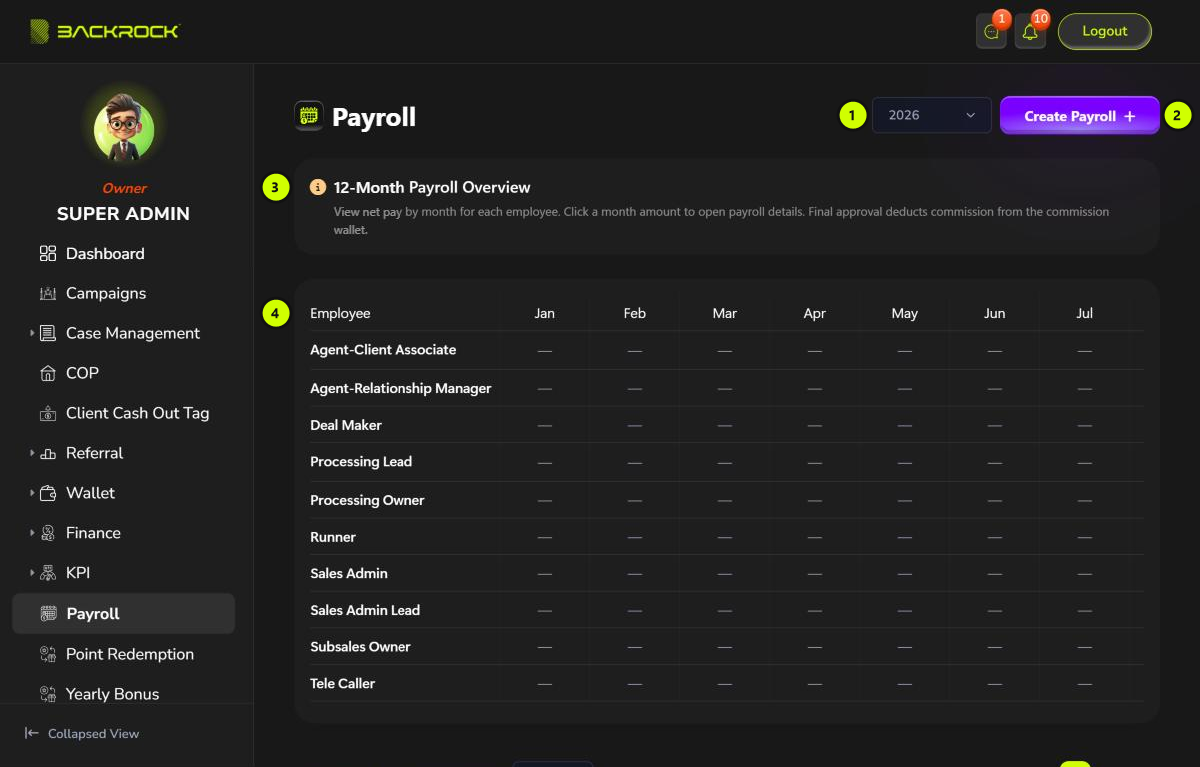
1. Year
Choose the year to show. The current year is selected when the page opens. You can choose this year or one of the 4 years before it.
2. Create Payroll
Opens the form to prepare a payslip. See Create a payslip. You only see this button if your role can create payroll and view all payroll.
3. Info box
A short reminder of how the page works.
4. Overview table
One row per employee, sorted by name, with a column for each month.
If your role can view all payroll, you see every employee. Otherwise, you only see your own row.
Months and totals
The table is wider than the page. Scroll it to the right to see the later months and the Year Total.
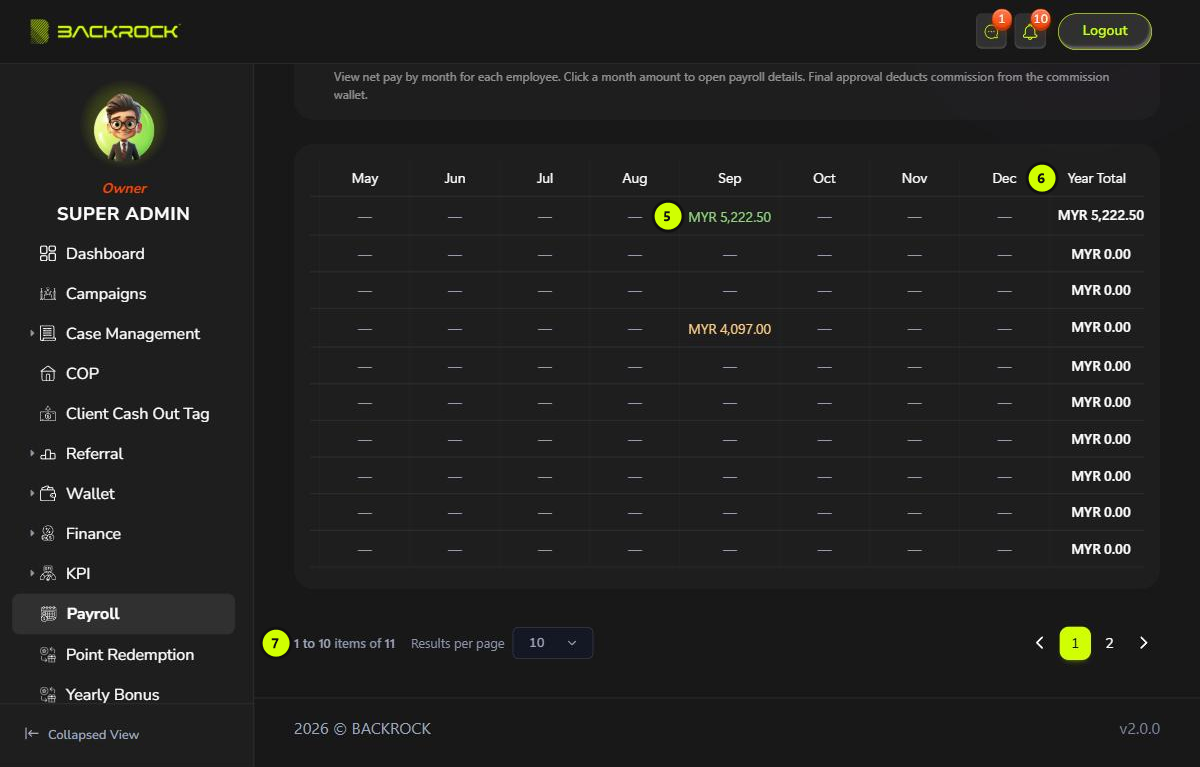
5. Monthly net pay
Each month shows the Net Pay of that month's payslip, or — if there is none. The colour shows its status:
| Colour | Status |
|---|---|
| Green | Approved |
| Yellow | Waiting for approval |
| Red | Rejected |
Click an amount to open the payslip details.
6. Year Total
The total net pay of the approved payslips of the year. Payslips that are waiting for approval or rejected are not counted.
7. Pages
Use Results per page and the page numbers to move between employees.
Create a payslip
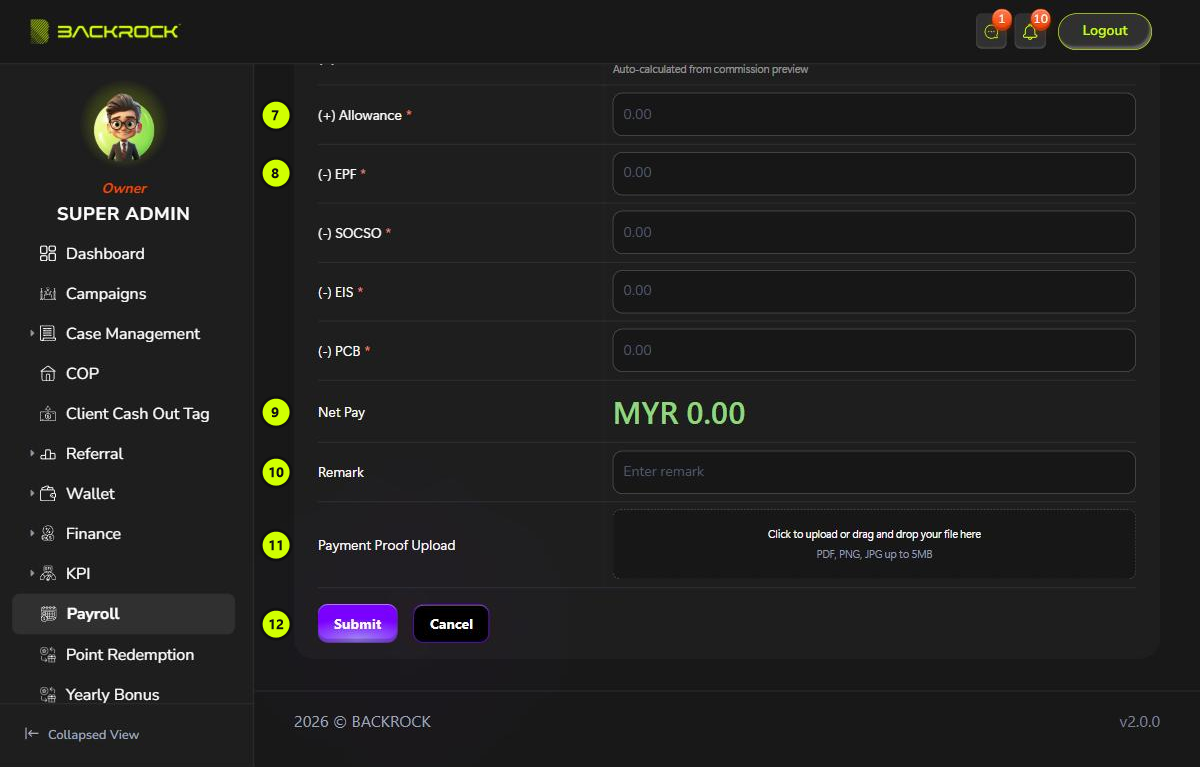
The form is long. Its parts are shown in two pictures.
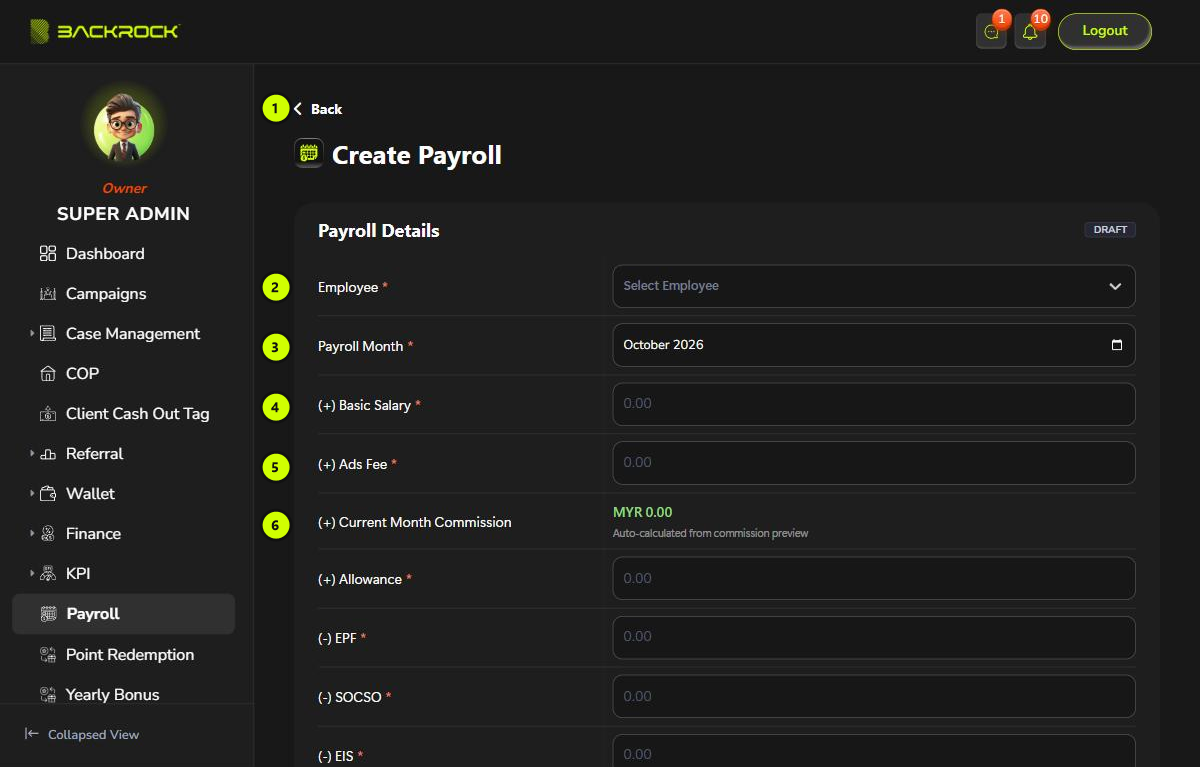
- Back: returns to the Payroll page.
- Employee (required): choose the employee. You can type to search, or scroll down the list to load more employees.
- Payroll Month (required): the current month is selected.
- (+) Basic Salary (required).
- (+) Ads Fee (required).
- (+) Current Month Commission: worked out for you after you choose the employee and month. It is the commission available in the employee's commission wallet, including any balance carried over from earlier months. Click View Commission Breakdown to see the commission items earned in the chosen month.
If the employee has a balance in their annual bonus wallet, (+) Yearly Bonus also shows. It is the whole available balance and is worked out for you.
-
(+) Allowance (required).
-
Deductions (all required): (-) EPF, (-) SOCSO, (-) EIS and (-) PCB. Type the amounts. They are not worked out for you.
-
Net Pay: worked out as you type.
Net Pay = Basic Salary + Ads Fee + Allowance + Commission + Yearly Bonus − EPF − SOCSO − EIS − PCB
-
Remark (optional).
-
Payment Proof Upload (optional): click the upload area and choose one PDF, PNG or JPG file of up to 5MB. You can also add it later.
-
Submit: click it, then Submit again to confirm. You see Payroll created successfully, pending layer 1 approval and return to the Payroll page. Click Cancel to leave without saving.
If a required field is empty, it shows This field is required. You can enter 0.
Each employee can only have one payslip per month. You can only create the month again if the earlier payslip was rejected.
Each payslip includes the employee's whole available commission. Approve one month's payslip before you create the next one for the same employee. Otherwise the second payslip includes the same commission again and can't be approved.
Approval
A new payslip goes through two approvals: Layer 1 (HR approval) then Layer 2 (admin approval). The people who can approve each layer get a notification. They approve or reject the payslip on the Approval page. Nobody can approve their own payslip.
| Status | What it means |
|---|---|
| Pending 1st Approval | Waiting for the first approval |
| Pending 2nd Approval | The first approval is done. Waiting for the second |
| Approved | Both approvals are done |
| Rejected | Rejected at one of the layers. A reason is always given |
When the payslip is fully approved:
- The commission on the payslip is taken out of the employee's commission wallet, and the yearly bonus (if any) out of their annual bonus wallet.
- The employee gets a Payslip Approved notification.
A rejected payslip can't be changed. Delete it and create the month again.
Payslip details
Click a month amount on the overview to open Payroll Details.
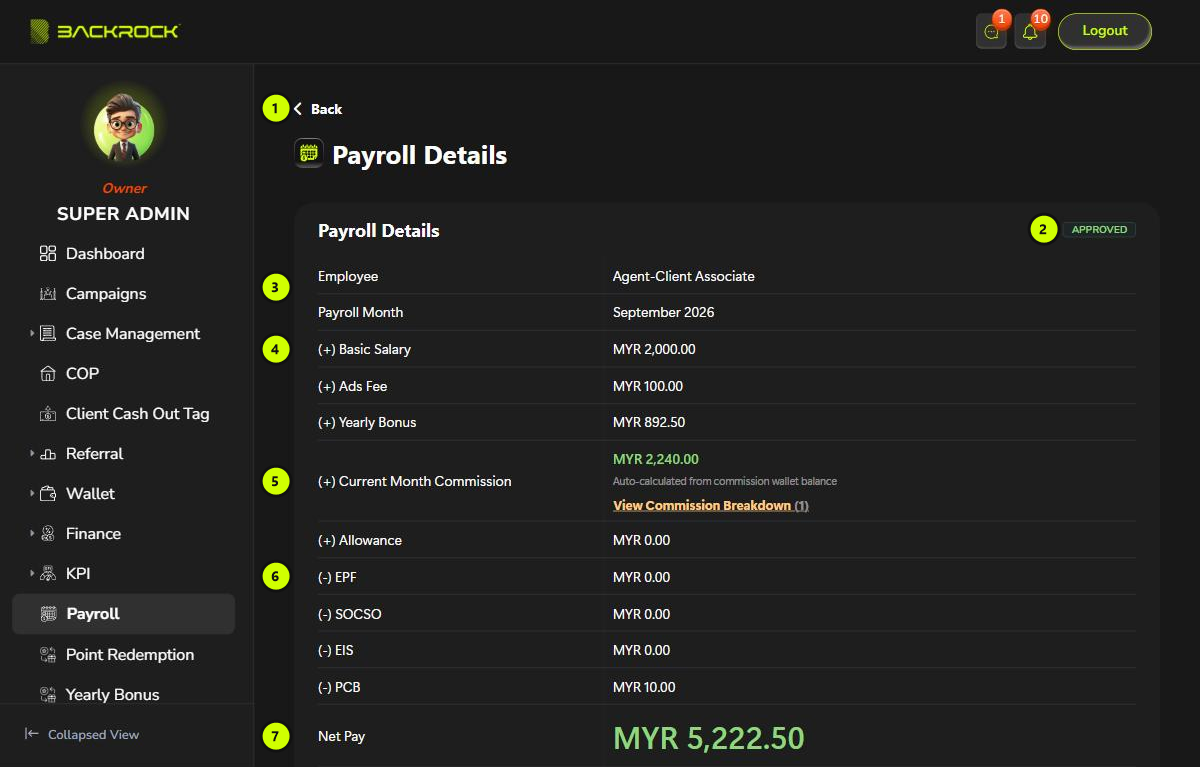
- Back: returns to the page you came from.
- Status: for example APPROVED. See Approval.
- Employee and Payroll Month.
- Earnings: Basic Salary, Ads Fee and, if any, Yearly Bonus.
- (+) Current Month Commission: click View Commission Breakdown to see the commission items.
- Allowance and deductions: Allowance, EPF, SOCSO, EIS and PCB.
- Net Pay.
At the top right, you may also see:
- Edit: while the payslip is still waiting for the first approval, if your role can edit payroll.
- Delete: while the payslip is not approved, if your role can delete payroll. Click Delete to confirm.
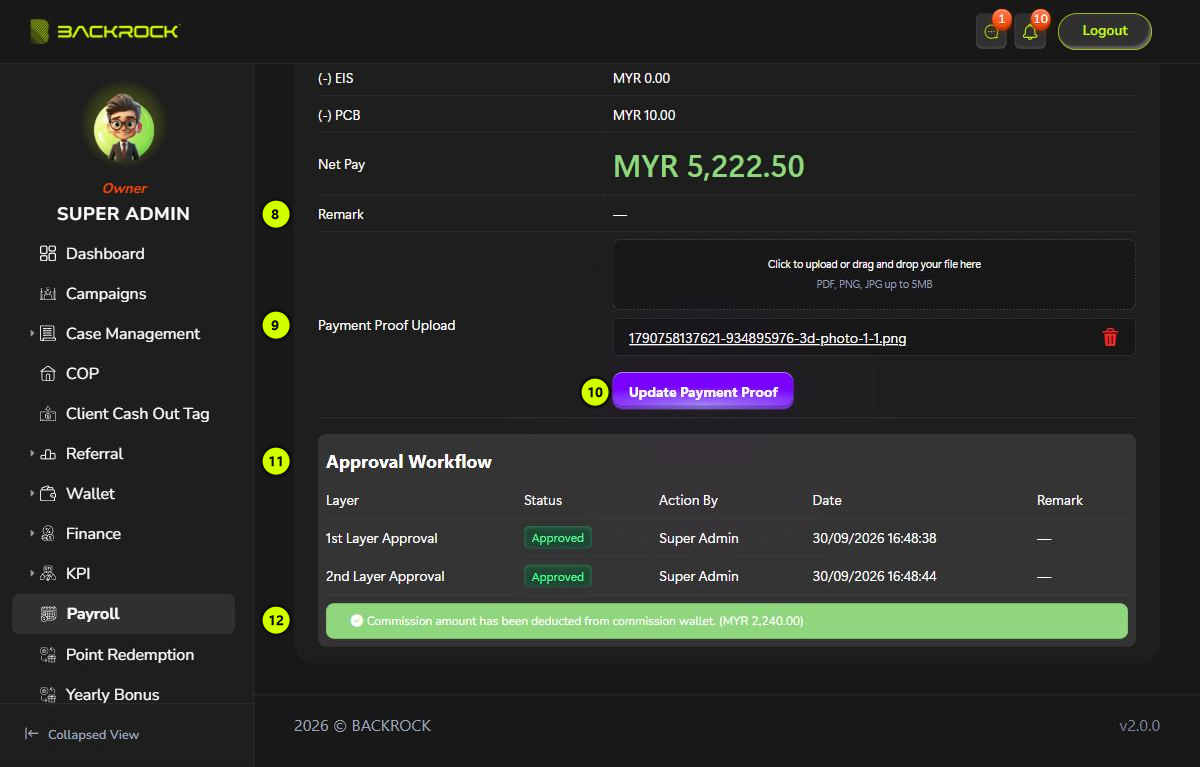
- Remark.
- Payment Proof Upload: the payment proof file. Click it to open it.
- Update Payment Proof: for an approved payslip, choose a new file and click this button, then Update, to replace the payment proof. You need permission to edit payroll.
- Approval Workflow: for each layer, the Status, who acted (Action By), the Date and the Remark.
- When the payslip is approved, a message shows the commission amount taken from the commission wallet.
Edit a payslip
You can only edit a payslip while it is waiting for the first approval. On the payslip details, click Edit.
- Employee and Payroll Month can't be changed.
- Change the amounts, Remark or Payment Proof.
- Click Update, then Update again to confirm. You see Payroll updated successfully and stay on the page.
- Back and Cancel return to the page you opened the payslip from, usually the Payroll page.
The commission and yearly bonus are worked out again from the employee's wallets when you update, so the saved Net Pay may differ slightly from what the form showed.