Role & Permission
A role is a set of permissions, for example "view cases" or "approve payments at layer 1". Each user has one role, their System Role (see Create, View and Edit a User). The role decides which menus, pages and buttons the user sees, and what the system lets them do.
To open it: in the left menu, click Setting > Role & Permission.
Permissions
Set in Role & Permission:
| Item | Permission |
|---|---|
| Role & Permission menu, list and View | Roles & Permissions > View |
| Create Role | Roles & Permissions > Create |
| Edit, Disable / Enable | Roles & Permissions > Edit |
Role list
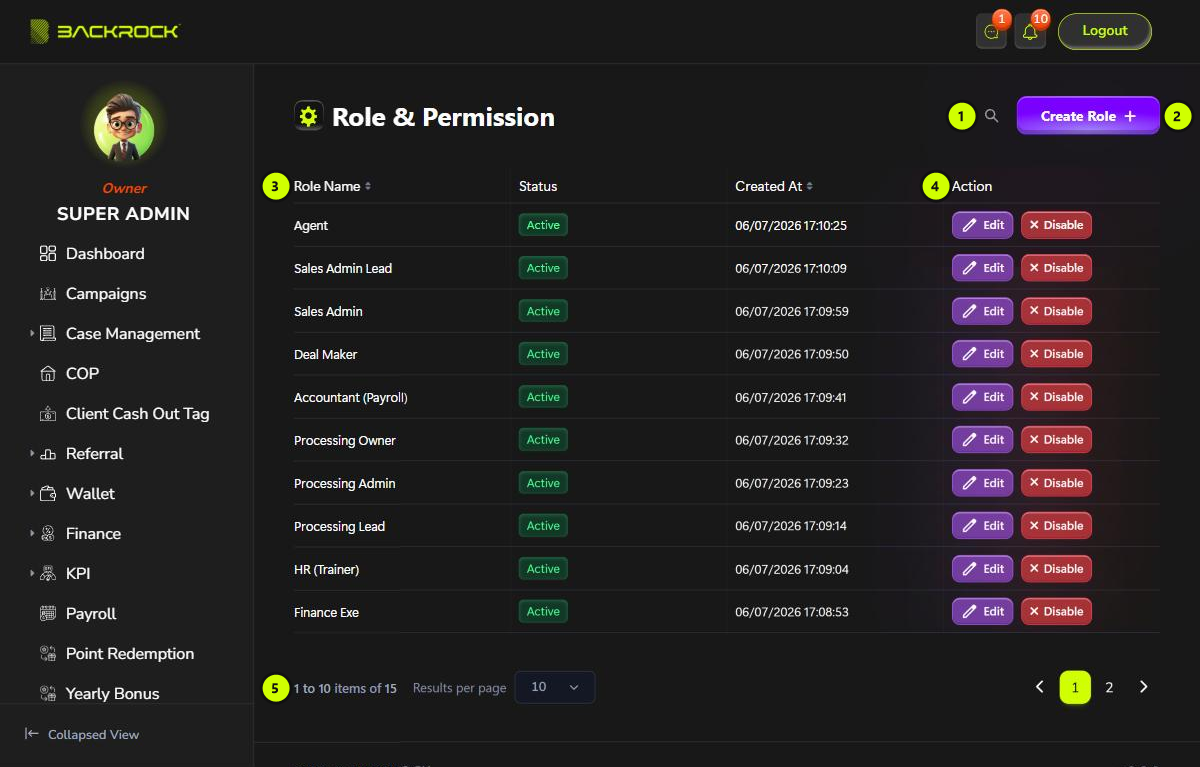
- Search: click the magnifier and type a role name.
- Create Role: opens the form to add a role. You only see it if your role can create roles.
- Role table: the Role Name, Status and Created At. The newest roles are shown first. Click Role Name or Created At to sort.
- Action: Edit and Disable / Enable need permission to edit roles. View shows for roles that can only view.
- Edit: opens the role to change its permissions.
- View: shown instead of Edit if your role can only view roles. It opens the same page as Role Details, read-only, so you can see which permissions the role has.
- Disable / Enable: changes the role's status straight away, without asking. Users with an inactive role can't log in, and users who are already logged in are sent back to the login page the next time they do anything.
- Pages: use Results per page and the page numbers to move between pages.
Create a role
Click Create Role. The picture below shows an existing role.
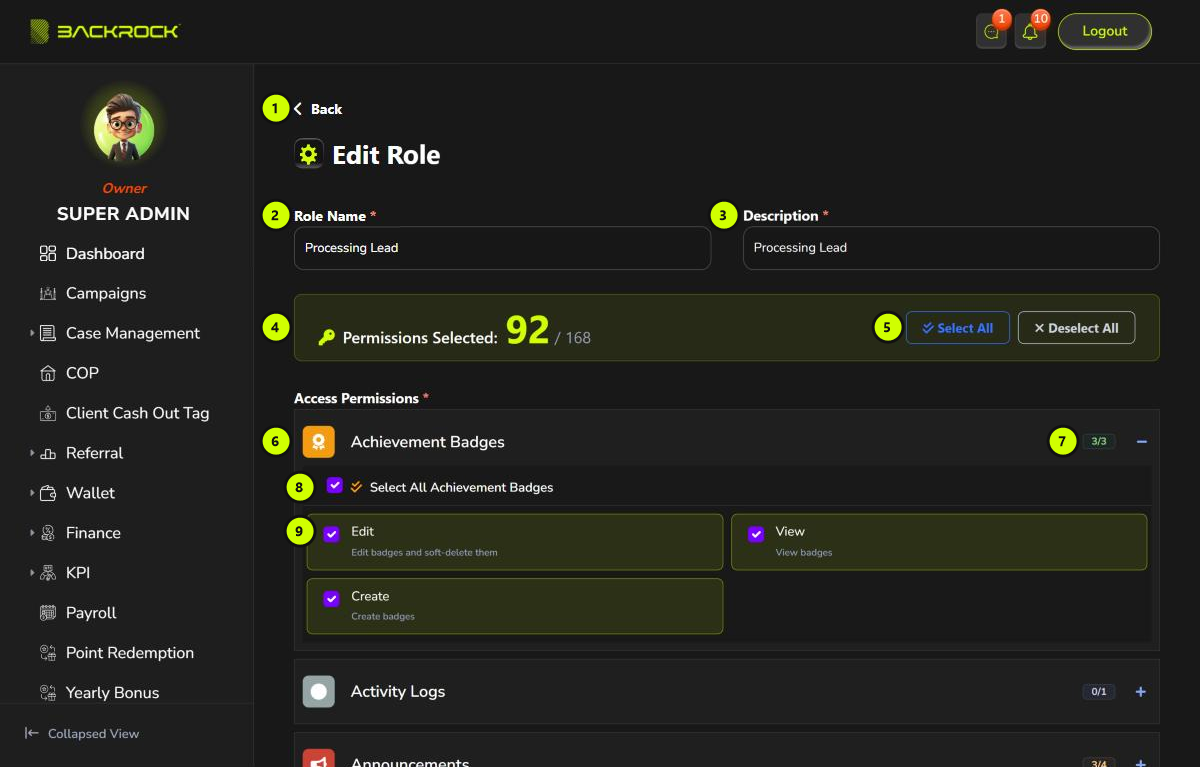
- Back: returns to the list without saving.
- Role Name (required), for example "Sales Manager".
- Description (required): what the role is for.
- Permissions Selected: how many permissions are ticked, out of all permissions.
- Select All / Deselect All: ticks or unticks every permission.
- Module: each part of the system, for example Achievement Badges or Cases. Click it to open or close it.
- Count: how many of the module's permissions are ticked. It is green when all are ticked.
- Select All [module]: ticks or unticks all of the module's permissions.
- Permission: click it to tick or untick it. The text below it explains what it allows.
At the bottom, click Submit to save. You see Role created successfully and return to the list. Click Cancel to leave without saving.
If no permission is ticked, you see Please select at least one permission.
Tips
- Ticking any other permission of a module (for example Edit, Create or View all) also ticks its View, because the user can't open the page without it. Unticking View unticks the module's other permissions.
- A new role starts with the Dashboard and Profile & Security permissions ticked. Profile & Security > Profile details opens the Profile page, and Login password lets the user change their own password.
- View all lets the user see everyone's records, not only their own. For example, Users > View all shows the users of every department, and Customers > View all shows every customer.
- Approve layer 1 and Approve layer 2 decide who can approve each layer on the Approval page.
- Reports has one permission for each report, and Dashboard has one for each card.
Edit a role
Click Edit on a row, change the permissions, then click Update. You see Role updated successfully.
The new permissions apply to every user with this role straight away. The menus and buttons they see change the next time they refresh the page.
- Anyone who can edit roles can also change their own role. Only give the permission to edit roles to people you trust.