Withdraw Request
The Withdraw Request page lists the withdrawal requests. Members send these from the Member Portal (see Withdraw in the Member Portal guide). From here you approve or reject each request, then mark it as paid once the money has been sent.
To open it: in the left menu, click Wallet > Withdraw Request.
If your role can view all withdrawal requests, you see every request. Otherwise, you only see the requests you sent yourself.
Permissions
Set in Role & Permission:
| Item | Permission |
|---|---|
| Withdraw Request menu and list | Withdrawal > View |
| See every request, not only yours | Withdrawal > View all |
| Approve / Reject | Withdrawal > Approve |
| Mark as Paid | Withdrawal > Mark as paid |
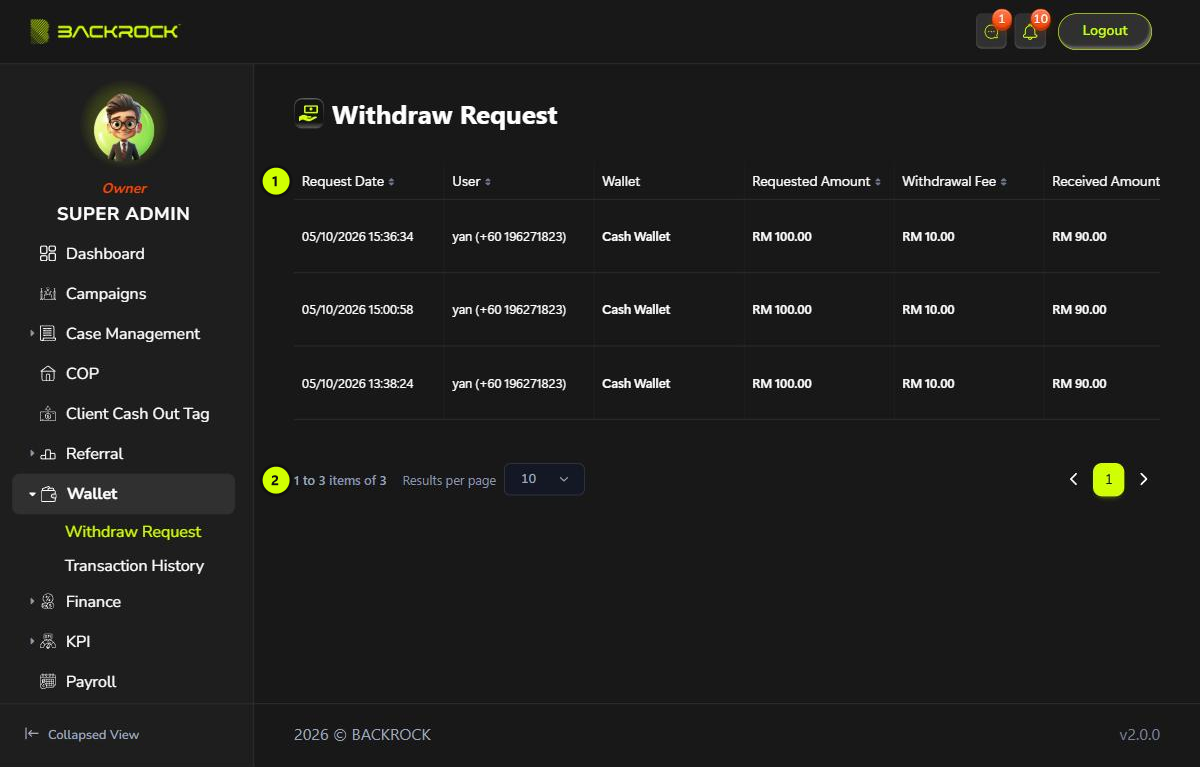
1. Request table
The newest requests are shown first. Click Request Date, Received Amount or Status to sort.
| Column | What it shows |
|---|---|
| Request Date | When the request was sent |
| User | Who sent the request, with their phone number |
| Wallet | The wallet the money is withdrawn from, for example Cash Wallet |
| Requested Amount | The amount taken from the wallet |
| Withdrawal Fee | The fee for this withdrawal |
| Received Amount | What the user receives: the requested amount minus the fee |
| Bank | The user's bank name, account number and account name |
| Remark | The rejection reason, or the payment reference number once paid. - if there is none |
| Attachment | The payment proof added when the request was marked as paid. Click a file to open it |
| Status | See part 3 |
| Action | See part 4 |
2. Pages
Shows how many requests there are, for example 1 to 3 items of 3. Use the page numbers to move between pages, and Results per page to show 10, 25, 50 or 100 requests per page.
Status and actions
The table is wider than the page. Scroll it to the right to see Status and Action.
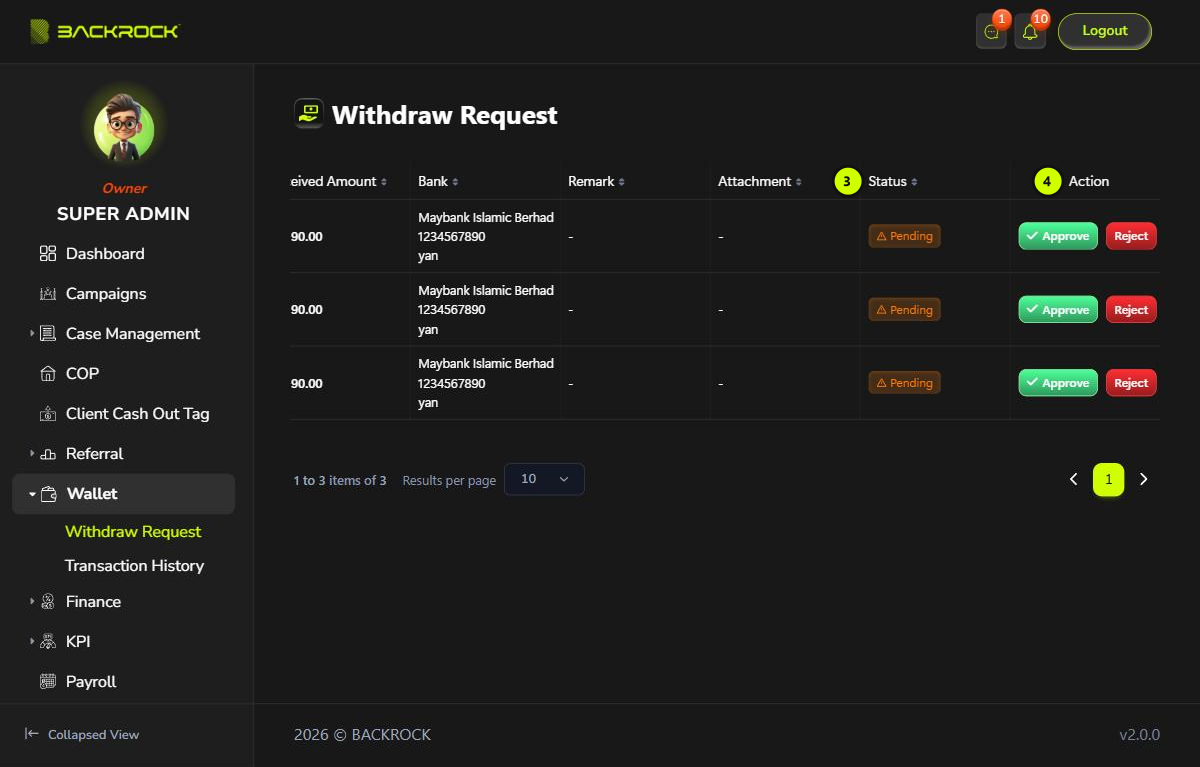
3. Status
| Status | What it means |
|---|---|
| Pending | Waiting for review |
| Approved | Approved. The money will be paid on the wallet's payout day |
| Rejected | Not approved. The requested amount was returned to the user's wallet |
| Paid | The money has been sent to the user's bank |
4. Action
The buttons depend on the status and on what your role can do.
| Button | When you see it |
|---|---|
| Approve and Reject | The request is Pending and your role can approve withdrawals |
| Mark as Paid | The request is Approved and your role can mark withdrawals as paid |
Approve a request
- Click Approve on the row.
- Click Yes to confirm.
You see Withdraw approved. The status changes to Approved, and the payout date is set to the next payout day of the wallet. The user gets a notification with the payout date.
A request can only be approved if the wallet has a payout day set. Otherwise you see an error and the request stays Pending.
Reject a request
- Click Reject on the row.
- In Reject Request, type the Reject Reason. It is required. Without it, you see Please provide a reason for rejection.
- Click Reject, then Yes to confirm.
You see Withdraw rejected. The status changes to Rejected, and the full Requested Amount goes back to the user's wallet. The user gets a notification with the reason, and the reason is shown in Remark.
Mark a request as paid
After you have sent the money to the user's bank:
- Click Mark as Paid on the row.
- Type the Payment Reference No. It is required. Without it, you see Please enter payment reference number.
- Optional: add the payment proof in Attachment. Click the upload area and choose one or more PDF, PNG or JPG files, up to 5MB each. A larger file is not added, and you see File size must be less than 5MB. Click Remove next to a file to take it off.
- Click Mark as Paid, then Yes to confirm.
You see Withdraw marked as paid. The status changes to Paid, the reference number is shown in Remark, and the files are shown in Attachment. The user gets a notification with the reference number.